Manage galleries
Gallery list page
This is overview page. Here you can edit, clone, delete, import, export or publish a gallery.
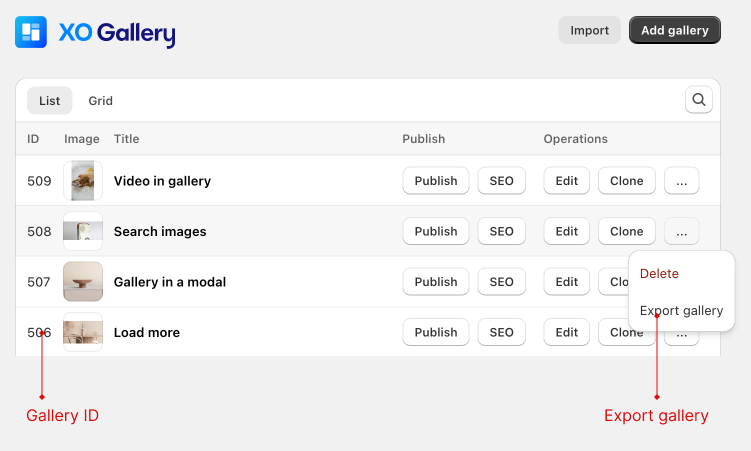
Export gallery
To export gallery, click ... button, then choose Export gallery
Save export json file.
Import gallery
You can use exported gallery json file and import to another store.
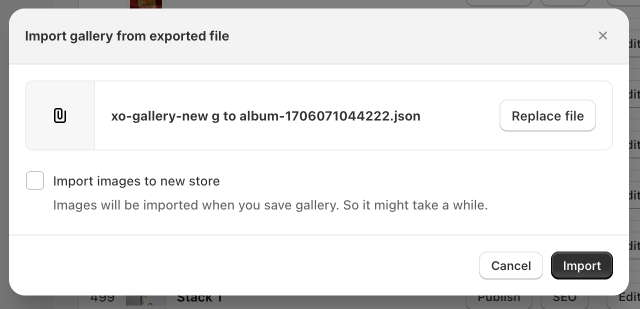
All images are in old store by default. If you want to transfer images to new store, check Import images to new store.
Add new gallery
- From gallery list page, click Add new Gallery
- Name your gallery
- Upload images
- Press Save
Images
Here you can upload new images, add images from Shopify files or Product to your gallery.

Image settings
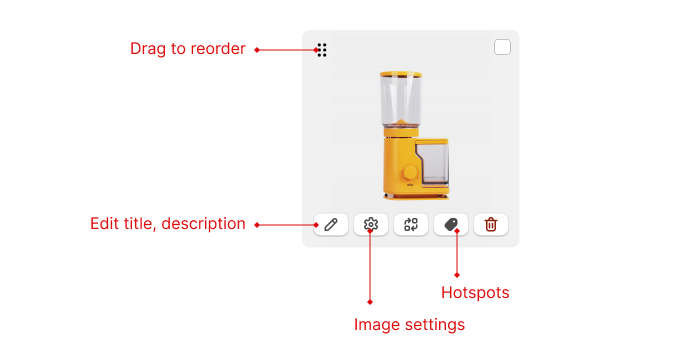
Here you can change settings for the image:
- Edit content:
- Add title/description... (depend on what you choose in design tab)
- Enable video (show in popup): support Youtube & Vimeo video. Just paste video URL here.
- Image settings:
- Filter (if you enable filter in settings)
- Link
- Alt text
- Image width (depend on gallery type): compare with column
- Image height (depend on gallery type): compare with column
- Hover effect: here you can choose different hover effect for each image
- Appear effec: here you can choose different appear effect for each image
- Setting show/hide on different devices
- Replace image: Change image to another image
- Hotspot: (pro plan)
- Tags product
- Add custom link
- Show hotspot with/without number
- Delete image
Hotspot / Shoppable Galleries
You can tag a product or add custom link to your images. Open Image settings > Hotspot
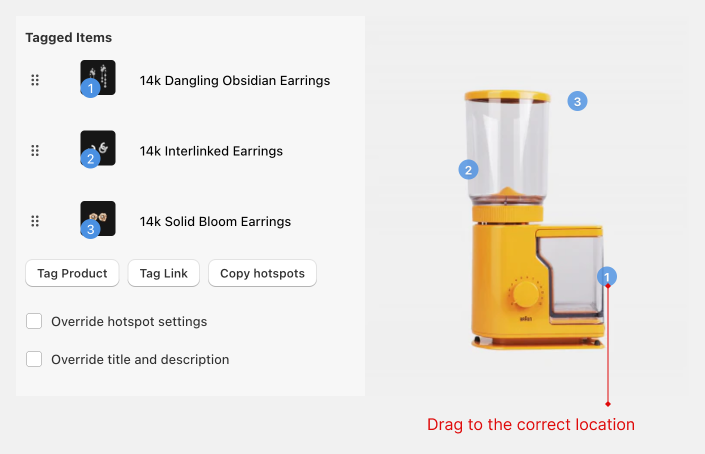
- Tag some products or links. This will appear when user view image in popup.
- Click Enable hotspot if you want to show hotspot in images. You can drag hotspot anywhere on image.
- Place title / description
You can copy hotspot from 1 image to another images.
- Opem image settings > Hotspot, click Copy hotspots
- Open image settings (of another image) > Hotspot, click Paste hotspot
Add "View more" button for each product/link:
- Click Settings tab, find and check Enable tagged product view more button
- Fill button text and choose style
Gallery settings
You can access gallery settings by clicking Settings when edit gallery.
Gallery type
-
Grid a regular set of equal rows and columns grid of images that displays every image as a square
-
Masonry placing elements in optimal position based on available vertical space, sort of like a mason fitting stones in a wall
You don't have to calculate and crop image in some fixed with & height. XO Gallery do it for you.
-
Stack placing elements near each other
-
Justified style like Flickr images
-
Carousel Put image in carousel type
Hover effect
Set global effect for all images in gallery. You can set different effect for single image in image settings popup.
List of all effects here.
If you use Hoverdir effect, you can't set different effect for single image in gallery.
Appear effect
This will hide all gallery images, then show images when user scroll.
Enable popup
Here you can:
- Choose effect for popup
- Change background opacity
- Show/hide caption
- If you choose design type with description, you can choose to add description text to the caption
- Limit display item (with config text)
Loadmore & filter will be disabled if you enable limit feature.
Loadmore
This feature is useful when you have many images in your gallery and want to show a few images on first load. The demo is here
Filter
Add filter for images in gallery. The demo is here
Filter is available for Grid, Masonry, Stack & Justified types.
Images
Image order
Change order of images in gallery:
- Normal: follow upload order
- Reverse: reverse upload order
- Random: Image will display random everytime user visit gallery page.
Thumbnail size
Images in gallery will be resized for fast loading. Here you can manual set thumbnail width for your images. Popup will use original image that you upload.
Option to crop image in particular size.
Image will be cropped from center. Image crop can't be upscale.
Lazyload
Lazyload is enabled by default. Check if you want to disable lazyload.
Gallery design
Here you can modify how images are displayed.
- Choose type
- Simple title
- Title & description
- Title & button
- Button
- Image: with this type, user can see other image when hover over an image.
- Disable (no hover layer)
- Custom HTML
- Custom for item
- Custom for hover layer
Gallery build page
Responsive
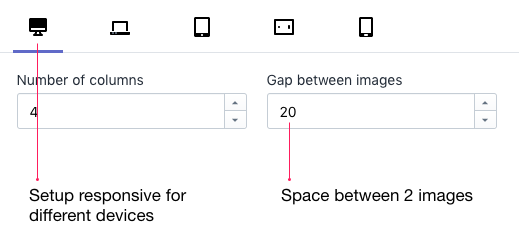
Image order panel
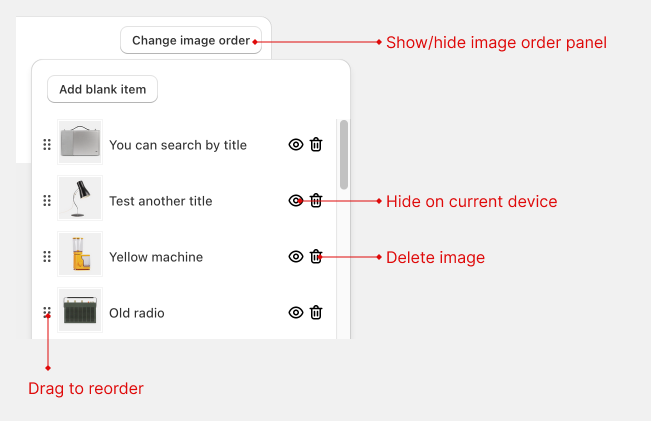
This tool give you quick way to reorder images, add blank item, show/hide image (or blank item) in specific devices.
File requirements
Image file requirements
| Attribute | Requirement |
|---|---|
| File size | Maximum of 6 MB (megabytes) |
| Resolution | Maximum of 20 MP (megapixels) |
| Aspect ratio | Between 100:1 and 1:100 |
| File formats | JPEG, PNG, WEBP, HEIC, and GIF |
Video file requirements
| Attribute | Requirement |
|---|---|
| File size | Maximum of 50 MB (megabytes) |
| Resolution | Maximum resolution of 4K |
| Video length | Maximum video length of 10 minutes |
| File formats | MOV and MP4 |